- 관련 Fluke 회사:
- Fluke
- Fluke Biomedical
- Fluke Networks
- Fluke Process Instruments
Pressure comparators and digital reference pressure gauges vs deadweight testers
Calibration of analog pressure gauges and sensors in an in-house calibration lab or on site has traditionally been performed using a deadweight tester (DWT). Recently, reference pressure gauge technology has developed to the point where, in many cases, a reference pressure gauge with a pressure comparator can be a viable alternative to the deadweight tester.
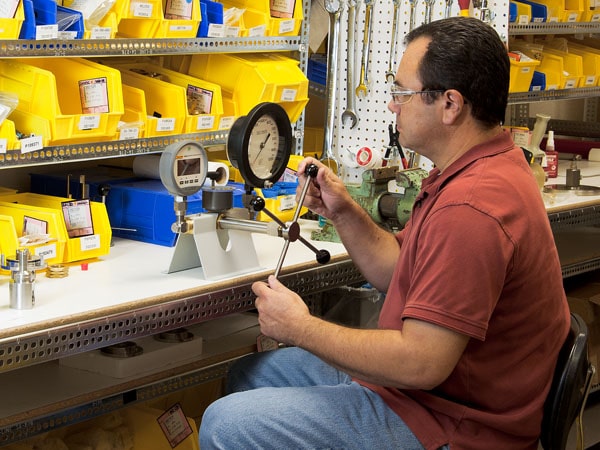
Deadweight testers
A conventional deadweight tester generates, controls, and measures pressure. The deadweight tester operates on the basic pressure equation, where a series of masses are stacked on a piston of known area. Using the equation
Pressure = Force/Area, where Force = Mass x Acceleration
(and where acceleration is local gravity) we can see that pressure directly relates to mass. We stack known masses corresponding to the nominal pressure that we want to calibrate on the device under test (DUT) and operate the pump until the masses rise (or float). At this point, we know, based on the amount of mass we have applied, exactly what pressure we are applying to the bottom of the piston; and using Pascal’s law, which states that pressure exerted anywhere within a confined incompressible fluid is transmitted equally throughout the fluid, we therefore know what pressure we are applying to the DUT.
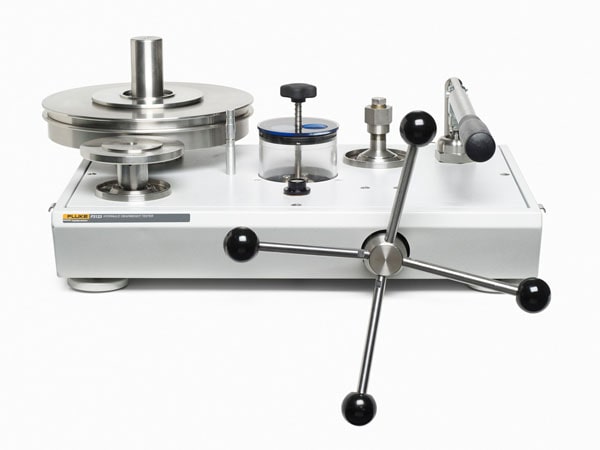
A conventional deadweight tester like this Fluke Calibration P3123 Hydraulic Deadweight Tester generates, controls and measures pressure
Deadweight tester uncertainty
The area of the piston and the weights of the masses can be determined to be a very good level of uncertainty, and acceleration due to local gravity can be calculated (or the masses can be mechanically adjusted to match the local gravity), so the actual pressure can typically be known to an uncertainty of 0.025% or better. Using the traditional requirement of 4:1 TUR (whereby the uncertainty of the reference should be at least four times better than the uncertainty of the DUT) we can see that this type of pressure calibration equipment is suitable for DUTs with uncertainties of 0.1% or more. Typically, an analog pressure gauge uncertainty specification is expressed as a percentage of full scale whereas a deadweight tester is effectively a percentage of reading, so the test uncertainty ratio (TUR) will improve at pressures less than 100% of scale.
Deadweight testers with uncertainty of 0.015 % are available, which allows a wider range of devices to be calibrated. Software correction, to take account of the uncertainties due to temperature, head height and media properties, can further improve deadweight tester uncertainty to 0.008%, which allows for DUTs with uncertainty as low as 0.025% (giving a TUR of 3.12:1, which can be acceptable in some circumstances).
Fluke Calibration PressCal software can be used to compensate for uncertainties due to test and ambient conditions, and it also enables the DWT to be used in areas with different local gravities.
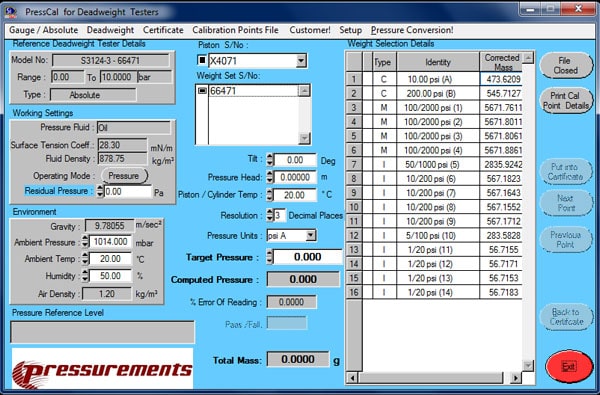
Use Fluke Calibration PressCal software to compensate for variations in test and ambient conditions, or in areas with different local gravities.
Pressure comparators
A pressure comparator operates in a similar manner to a deadweight tester in that pressure is generated until the desired pressure is achieved (in the case of the deadweight tester, the piston floats; in the case of the pump, the reference gauge reads the pressure) and then the DUT is compared to the reference pressure. Pressure comparators can operate in a variety of pressure ranges (including vacuum) and media – gas, water, and oil. Rather than a piston and one pressure port for the DUT, the comparator has two ports – one for the reference gauge and one for the DUT.
Fluke offers three families of pressure comparators:
700 Series hand pumps
These are completely portable and can be operated with one hand. They generate from vacuum to 600 psi (pneumatic) and 10,000 psi (hydraulic). They are ideal for use with reference gauges (or pressure modules) as truly portable calibration systems for use on the shop floor.
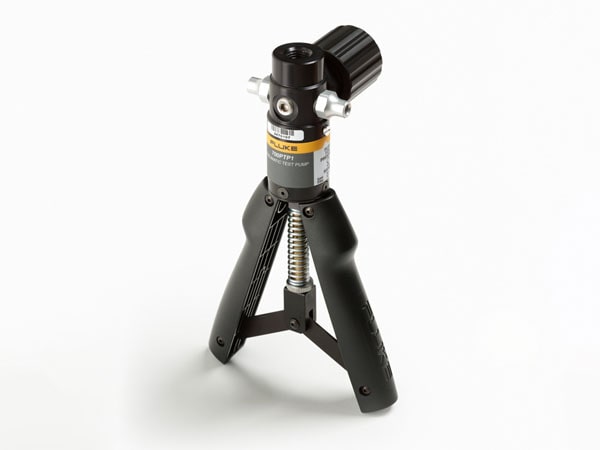
Fluke 700PTP-1 Pneumatic Test Pump
P5500 Series low-to-mid-pressure pumps
These operate at up to 300 psi (pneumatic) or 10,000 psi (hydraulic, water or oil) and are portable, though not handheld. They are ideal for work on the bench or in the field where the 700 series hand pumps are not sufficient.
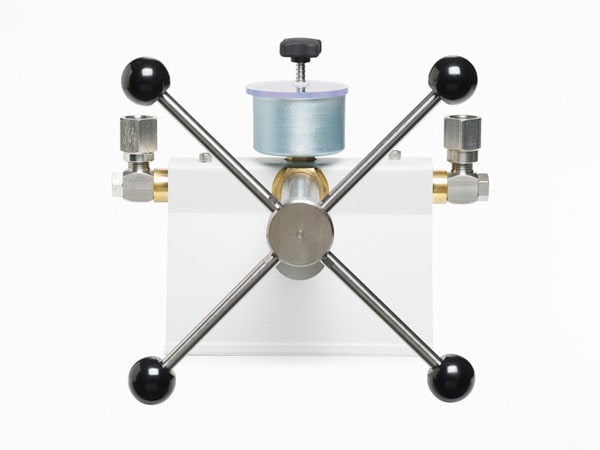
Fluke Calibration P5514 Pressure Comparator
P5500 Series high pressure pumps
These operate at up to 3,000 psi (pneumatic) or 20,000 psi (hydraulic). These comparators are based on deadweight tester chassis of similar pressure ratings; however, the piston/cylinder assembly is replaced by the reference port.
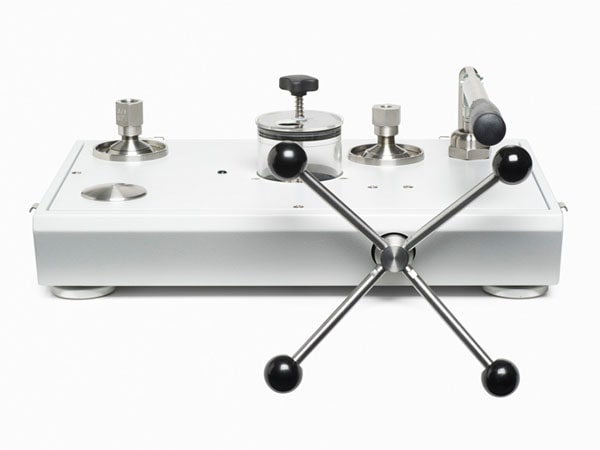
Fluke Calibration P5515 Pressure Comparator
Reference gauges
Deadweight testers and pressure comparators have been available for several decades. However, reference gauges with sufficient accuracy to offer a viable alternative to deadweight testers have only recently become available. Fluke and Fluke Calibration offer three classes of digital reference gauge:
700G. These have an uncertainty of 0.05% of scale, so generally are suitable for calibration of DUTs with uncertainties of 0.2% of scale or greater.
Fluke 700G Precision Pressure Gauge Calibrator
700RG. These have an uncertainty of 0.04% of reading plus 0.01% of scale, so generally are suitable for calibration of DUTs with uncertainties of 0.2% of reading or greater.
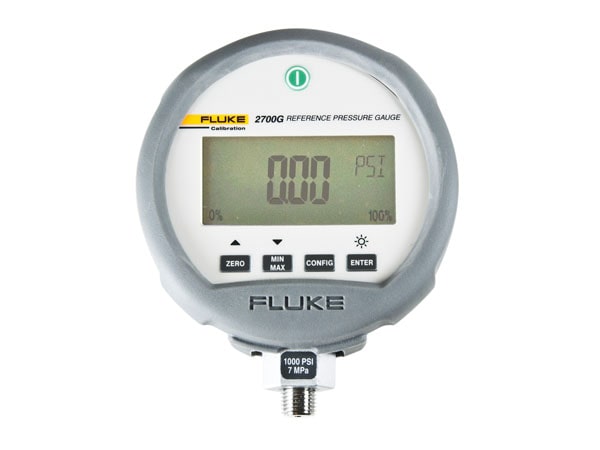
2700G. These have an uncertainty of 0.02% of scale, so generally are suitable for calibration of DUTs with uncertainties of 0.1% of scale or greater.

Fluke Calibration 2700G Reference Pressure Gauge
These gauges have such features as USB connectivity for uploading settings and downloading data, temperature logging and multiple different pressure units. The 700G and 700RG are also IS (intrinsically safe) rated.
Comparator plus reference gage configurations
A typical pressure comparator calibration setup is a comparator with a digital gauge such as a Fluke Calibration 2700G as a reference mounted on the reference port and the DUT connected to the test port. The pump is operated until the DUT reads a nominal pressure; the ‘actual’ pressure is read off the reference gauge, and the data is recorded for the calibration report. This comparator system can be permanently built up into a pressure bench, for use in the lab, or it can be portable for use in in the field.
In many cases there may be a range of gauges or devices to calibrate, with various pressure ranges, and some of which will be percentage of reading uncertainty and some of which will be percentage of scale uncertainty. To address this range of DUTs, several reference gauges can be used with one comparator.
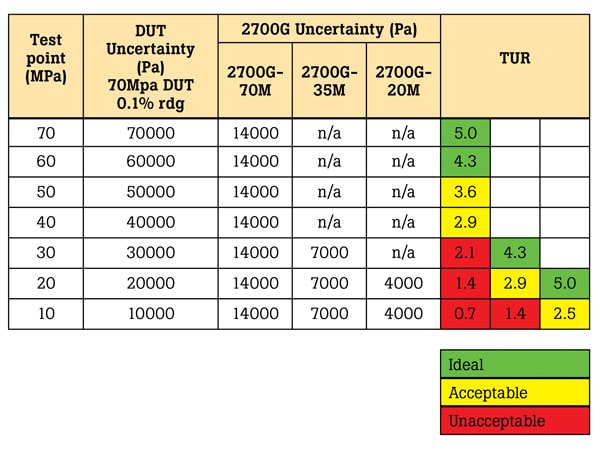
1. Accuracy. This is the main advantage of the deadweight tester. It can have uncertainty of as low as 0.008% (with software, 0.015% without) of reading, whereas a reference gauge and pump typically have uncertainty of 0.02% of scale (this can effectively be improved upon by using multiple reference gauges of different pressure ratings to add improved turndown, or rangeability, as shown above).
2. Adiabatic effects. According to the ideal gas law, P is directly proportional to Temperature and inversely proportional to Volume:
PV = nRT, where n is the amount of gas in moles, and R is the ideal gas constant
For a pump, pressure is set by adjusting the variable volume. As can be seen from the above, decreasing the volume (turning the hand wheel in or pumping the pump handle) will increase pressure, which is an increase in the energy in the system. While most of this energy is in the higher pressure, a portion of it generates an increase in temperature, so the temperature of the system has increased above the ambient room temperature. When you stop increasing the pressure, i.e., stop turning the variable volume hand wheel, the temperature also stops increasing and it gradually drops down to the ambient room temperature. From the equation above, we can see that as the volume is not changing, the drop in temperature results in a drop in pressure. The greater the pressure difference between adjacent setpoints, the greater the temperature change and hence the longer it takes to stabilize. The same effect is seen for decreases in pressure, as the handle is turned out and the volume (and therefore pressure) decreases, temperature will drop below ambient initially and then gradually return to ambient. Hence, a pump and reference gauge system take a certain amount of time to stabilize. Systems must be allowed to stabilize before readings are taken, and, as this stabilization process can appear to have similar symptoms to a leak, the user must also check that the setup has no leaks.
On the other hand, by comparison, deadweight testers are very stable. That is because they have a floating piston which acts as a barostat. A floating piston, in effect, automatically changes the volume of the system (by floating up and down, it is increasing and decreasing the volume), so it adjusts and compensates for the temperature induced pressure changes and maintains pressure stability. (Note, if the DWT piston is at its maximum extension, instability will be seen as it cannot float further to increase volume.)
3. Masses. Loading mass on a conventional deadweight tester is time consuming, can be done incorrectly and can be an ergonomic and safety concern. Also, masses must be adjusted for local gravity, so if the deadweight tester is moved, then masses must be readjusted, or software correction must be used. This is not a concern with a pump and reference gauge. In addition to the local gravity concern, the logistics of transporting masses can be difficult and expensive.
4. Pressure set points. The smallest mass value in a mass set determines the smallest pressure increment possible with a deadweight tester. Pressures between these increments are not possible. Some lab procedures or preferred best practices for analog gauge calibrations require setting nominal pressure values that the conventional deadweight tester is unable to achieve. A reference gauge can be set to any nominal pressure. Furthermore, most users prefer to have their instruments, especially analog gauges, calibrated at nominal values (cardinal points) rather than at arbitrary set points. With a traditional deadweight tester this is normally not possible, especially if the deadweight tester and pressure gauge are not operating in the same pressure units. Instead of using a limited mass set to generate pressures that only approximate the desired pressure points, the pump can be quickly and easily adjusted to set the pressure to the exact nominal pressure as indicated by the DUT, and then the actual pressure read from the reference gauge.
5. Recalibration. Deadweight testers are inconvenient to recalibrate, as the piston must be calibrated by a method called crossfloat, which is time consuming and requires considerable skill. It is also inconvenient and expensive to ship the deadweight tester and masses to a calibration laboratory for recertification. With a pump and reference gauge system, only the gauge needs to be routinely re-calibrated, being quicker and less costly than re-calibrating a deadweight tester.
A traditional deadweight tester offers better accuracy and stability than a pressure comparator with reference gauge(s), but the pump plus gauge(s) is easier to use and typically less expensive to both acquire and to own, so offers a viable and attractive alternative to the deadweight tester where the pump plus gauge(s) provides sufficient accuracy.
Resources and useful links
See related products
Get Help
-
Speak with a calibration product expert about your equipment needs
- 홈
- 제품
- 구입처 안내
- 뉴스
- 교육 및 세미나
- 사용자 가이드
- 서비스 및 지원
- 회사 정보

